

Formech Technical Newsletter - Mounting Tools and Moulds
Formech Technical Newsletter - Mounting Tools and Moulds
There are different methods of tool mounting depending on the type of tooling being used and the time available. A properly mounted tool makes it much easier to achieve good vacuum formings with consistency. We will refer to patterns, moulds/molds as tools throughout the newsletter.
Air flow
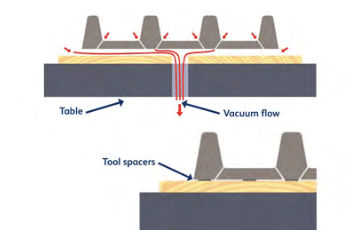
All tools need to have adequate air flow under their bases for two reasons:
1. To allow the vacuum to flow through the vacuum holes in the tool across the base and then directly down the main vacuum hole in the table/baseboard.
2. To allow the release air to travel up through the vacuum hole in the table across the underside of the tool, up through the vacuum holes and against the underside of the vacuum forming.
Occasionally some vacuum forming machines have the auto level and pre-stretch exit through the vacuum hole in the table. Raising the tool rather than drilling vacuum holes all-round the perimeter means that the air flow is greatly increased helping with the vacuum and the release.
Air gap between the tool and the table or baseboard
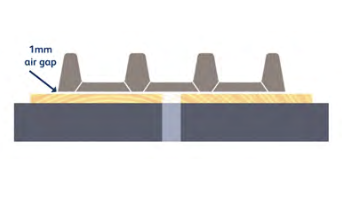
We would normally recommend an air gap in the region of 1mm (0.039”) between the bottomof the tool and the baseboard/table. If you are forming very thin material 0.5mm (0.195”) then it might be worth reducing the air gap to stop the material from being pulled under the tool and causing problems with release.
Spacers and fixings for securing & raising tools
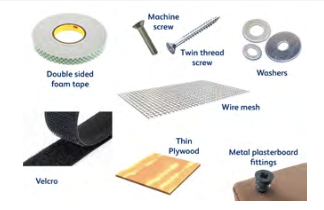
- Double sided foam tape + velcro: for short production runs
- Machine screws: For aluminium + porous resin (M6). Twin thread screws for mounting cast resin + tooling board
- Washers / Plywood / Wire mesh: to raise the tool off the baseboard
- Metal plasterboard fittings: to mount foam tools
Multiple tools

When mounting multiple tools we recommend that you have one main vacuum hole under the centre of each tool in the base board and then these are connected back to the main vacuum hole in the table. This should result in a fairly even spread of vacuum across all of the tools.
*Please note how the central vacuum hole on the base board is not required.
Alternative method for creating an air gap
Aluminium, resin or tooling board can also have small channels milled into the underside and then linked back to the main central vacuum hole in the base board. This means that the tool can be bolted down on to the baseboard without any air gap. This is useful for very thin material and the air flow will be much greater than drilling vacuum holes around the perimeter of the tool.
Why use a baseboard
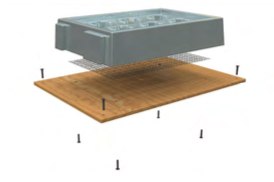
- A baseboard raises the base of the tool to the same level as the clamping of the sheet, making it easier to trim.
- It allows you to secure the tool in the same position every time which is useful for trimming.
- A tool with a minimal draft angle can be pulled out of the formed plastic sheet, when using the release air.
Baseboard materials
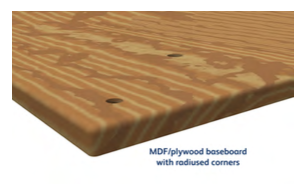
- MDF: usually 12mm (1/2”), 18mm (3/4”) or 25mm (1”) thick.
- Plywood: radius the corners to stop it catching on the plastic sheet.
- Steel sheet: this can be quite thin if used with a reducing window and you want the steel to be mounted to the original table holes in the corners.
- Aluminium plate: usually thicker than steel and can be mounted within the reducing window aperture.
Formech Technical Newsletter compiled by: Martin Smith, Senior Technical Support Manager, [email protected]
>>> Download PDF here